Radio Buttons


Introduction.  Radio Buttons are typically used when the developer wants the user to select only one of the options in a list.  For example, say you are filling out a form that requires you to enter a credit card.  The radio buttons likely give a list of the credit cards the site accepts.

Radio buttons are distinctly different from check boxes in that they are grouped in such a way that the user can only select one of them.

The following table contains a list of the constructors that are available for the JRadioButton class.


Constructor Description
JRadioButton(String) This will put the specified String as a label for the radio button
JRadioButton(String, boolean) This will put the specified String as a label for the radio button and initialize it as selected if the boolean argument is true
JRadioButton(Icon) This will put the specified icon as a label for the radio button
JRadioButton(Icon, boolean) This will put the specified icon as a label for the radio button and initialize it as selected if the boolean argument is true
JRadioButton(String, Icon) This will put the specified String as a label along with the Icon as a  label
JRadioButton(String, Icon, boolean) This will put the specified String as a label along with the Icon as a  label and initialize it as selected if the boolean argument is true


These constructors should look very similar to those of the checkboxes.  But because of the issues associated with allowing only one option in a group of radio buttons to be selected, we have one additional things we need to do.  We are going to quickly describe ButtonGroups.

The following table contains a typical code segment


//  after instantiating some buttons with name newButtons
//  this is often done with an array of JRadioButtons

ButtonGroup groupName = new ButtonGroup( );

//  now go through the radio buttons
//  either as they are constructed or after
//  and add them to the group

groupName.add(newButtons);


This sort of thing will often be done using loops to go through an array of JRadioButtons.

The other thing we need to consider when making use of radio buttons is how the program can sense that the user has interacted with them.  To reiterate a previous page we will make use of ItemListeners.

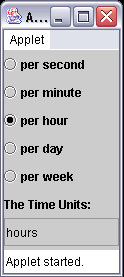
Displaying What's Selected.  Now we present our first example, an applet called TimeUnits.java.  This program allows the user to check a particular radio button and which will cause a display to change.


import java.awt.*;
import java.awt.event.*;
import javax.swing.*;
import javax.swing.event.*;

public class TimeUnits extends JApplet
{

// input radio buttons
JRadioButton[] timeUnits = new JRadioButton[5];
// input labels, textfields
JLabel lblTimeUnits = new JLabel("The Time Units: ");
JTextField txtTimeUnits = new JTextField(7);

public void init( )
{

// instantiate the grid that will coordinate the overall layout
JPanel panOverall = new JPanel( );
GridLayout gblOverall = new GridLayout(7,1);
panOverall.setLayout(gblOverall);


// develop the Radio Buttons
timeUnits[0] = new JRadioButton("per second");
timeUnits[1] = new JRadioButton("per minute");
timeUnits[2] = new JRadioButton("per hour");
timeUnits[3] = new JRadioButton("per day");
timeUnits[4] = new JRadioButton("per week");

// defining the button group for the radio buttons
ButtonGroup bgTimeUnits = new ButtonGroup();

// using a user defined class to handle radio button events
RadioButtonHandler handler = new RadioButtonHandler();
// grouping, configuring and placing the radio buttons into the GUI
for (int i = 0; i < timeUnits.length; i++)
{

bgTimeUnits.add(timeUnits[i]);
timeUnits[i].addItemListener(handler);
panOverall.add(timeUnits[i]);

}

// develop label and textbox for reporting which radio button is selected
panOverall.add(lblTimeUnits);
txtTimeUnits.setEditable(false);
panOverall.add(txtTimeUnits);

setContentPane(panOverall);

//  ends init( ) method

private class RadioButtonHandler implements ItemListener
{

public void itemStateChanged( ItemEvent event )
{

String timePeriod = "";

if (event.getSource( ) == timeUnits[0]) timePeriod = "seconds";
else if (event.getSource( ) == timeUnits[1]) timePeriod = "minutes";
else if (event.getSource( ) == timeUnits[2]) timePeriod = "hours";
else if (event.getSource( ) == timeUnits[3]) timePeriod = "days";
else if (event.getSource( ) == timeUnits[4]) timePeriod = "weeks";
txtTimeUnits.setText(timePeriod);

}

} // ends RadioButtonHandler class

} // ends the TimeUnits class


Since the size of the GUI has impact, here is TimeUnits.html.


<html>
<applet code="TimeUnits.class" width=100 height=200>
</applet>
</html>


The following image represents the GUI.


Notice how the words in the text box change as each radio button is selected.  You should also notice that only one radio button can be selected.

The code will be discussed in class.  The only things that is particularly new is the ways it

  • grouping the array of JRadioButtons
  • handles the radio button actions

Both of these have their own sections of code.  Notice how the RadioButtonHandler class implements ItemListener.

Changing Font Properties.  We are now going to use a program that I modified from Deitel and Deitel that changes the properties of some text based on which button the user selects.  It's got some fairly clever coding in it, though it's essentially a variation on what we did in the last webpage.  You should call the application RadioButtonTest.java.


import java.awt.*;
import java.awt.event.*;
import javax.swing.*;

public class RadioButtonTest extends JFrame
{

private JTextField t;
private Font plainFont, boldFont, italicFont, boldItalicFont;
private JRadioButton plain, bold, italic, boldItalic;
private ButtonGroup radioGroup;

public RadioButtonTest( )
{

super("Radio Button Test");

Container c = getContentPane();
c.setLayout(new FlowLayout());

t = new JTextField("Watch for the font style change",25);
t.setFont(new Font("TimesRoman",Font.PLAIN, 14));
c.add(t);

// create radio button objects
plain = new JRadioButton("Plain",true);
c.add(plain);

bold = new JRadioButton("Bold",false);
c.add(bold);

italic = new JRadioButton("Italic",false);
c.add(italic);

boldItalic = new JRadioButton("Bold/Italic",false);
c.add(boldItalic);

// Register events so user interactions will be listened for
RadioButtonHandler handler = new RadioButtonHandler();
plain.addItemListener(handler);
bold.addItemListener(handler);
italic.addItemListener(handler);
boldItalic.addItemListener(handler);

// Create grouping
radioGroup = new ButtonGroup( );
radioGroup.add(plain);
radioGroup.add(bold);
radioGroup.add(italic);
radioGroup.add(boldItalic);


plainFont = new Font("TimesRoman", Font.PLAIN, 14);
boldFont = new Font("TimesRoman", Font.BOLD, 14);
italicFont = new Font("TimesRoman", Font.ITALIC, 14);
boldItalicFont = new Font("TimesRoman", Font.BOLD + Font.ITALIC, 14);

t.setFont(plainFont);

setSize(325,100);
show( );

}

public static void main(String args[])
{

RadioButtonTest app = new RadioButtonTest( );

app.addWindowListener( new WindowAdapter( )
{

public void windowClosing(WindowEvent e)
{

System.exit(0);

}

}
);

}

private class RadioButtonHandler implements ItemListener
{

public void itemStateChanged(ItemEvent e)
{

if (e.getSource( ) == plain)

t.setFont(plainFont);

if (e.getSource( ) == bold)

t.setFont(boldFont);

if (e.getSource( ) == italic)

t.setFont(italicFont);

if (e.getSource( ) == boldItalic)

t.setFont(boldItalicFont);

t.repaint( );

}

} // ends RadioButtonHandler class

} // ends RadioButtonTest class


The following image represents the GUI.


Notice how the displayed text changes whether it is italicized and/or bold based on the user selections.  You should also notice how in this instance we needed more options in order to deal with limiting the user's choices.