Some Basic GUI Components
| Introduction.
In the previous webpage I discussed how we will make use of several
components for user interactions. While these are definitely the
most basic and we will do several others in the future, we need to start
someplace.
To review quickly, this webpage will have a section on each of the following components.
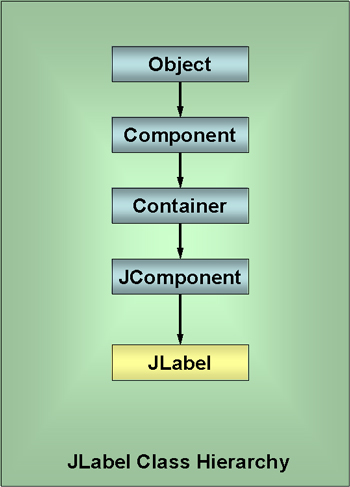
We won't actually implement any code in this webpage. Here we describe some general background that you should be able to use as a reference during the rest of the course. JLabel. JLabels are from the swing package and can be used to present the user some informative text or icon. They have JComponent as a parent class, which essentially means they extend JComponent. Labels can be created/constructed/instantiated using the JLabel class. These labels cannot be directly edited by the user. Though you could write code to get inputs from the user that modify the JLabel. The three most frequently used constructors are
A constructor is used to create the initial settings of the JLabel. Some examples follow.
If no alignment constant is specified the default is to have the label be centered. While there are quite a few other methods available, the programmer is more likely to make use of the following to work with JLabels.
For future reference you should notice that these are examples of what can well be called get and set methods. Developing classes that increase functionality through get and set methods is very important in many people's views of class and object oriented programming. In order to set an Icon you need to first instantiate one. Typical lines of code used to implement an icon when first developing the GUI follow..
In order to implement an icon later in the code you need to do something like the following.
You can also enable and/or disable images using the following code
There are plenty of other methods that are best surveyed in other sources such as java.sun.com. A diagram representing the class and inheritance (extends) hierarchy follows. This will make more and more sense as we progress through the semester. Notice the class hierarchy to JComponent. Most of our subsequent hierarchy diagrams will omit everything above JComponent. |
|
JTextField.
JTextFields are also form the swing
package. They also have JComponent as a parent class just like
JLabel. This implies that many of the same methods that work with
JLabel work with JTextField. By their basic nature and by default, a JTextField can accept input from a user. Though they can be configured so that the user cannot edit them. The basic constructors follow.
Some examples follow.
Some other methods that we are likely to use follow.
The following diagram represents the class hierarchy for JTextFields. It hints at the large variety of other options for GUI components. |
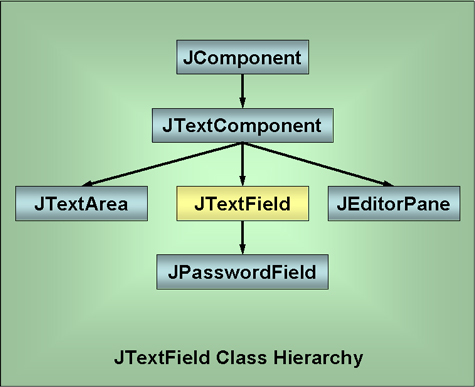
| JTextArea.
JTextAreas are something
we have already worked with a little bit. They are
apparent in the diagram above as a child of JTextComponent,
lateral to JTextField, in the GUI component hierarchy. The following bulleted list represents the constructor arguments that we will make use of. There are a couple more that make use of developer designed document models. But these are not where I want to take this course.
Some examples follow.
Some other methods that we are likely to use follow.
While there is much more that can be said about JTextAreas, the uses become increasingly obscure and infrequent. JButton. The last class we will present in this page has to do with developing command buttons. We will most often use these as an interface component that the user can click on in order to cause some sort of program execution to occur. These are essentially push buttons as opposed to things like radio buttons, toggle buttons and check boxes. The following diagram represents the class hierarchy branching off of JComponent. |
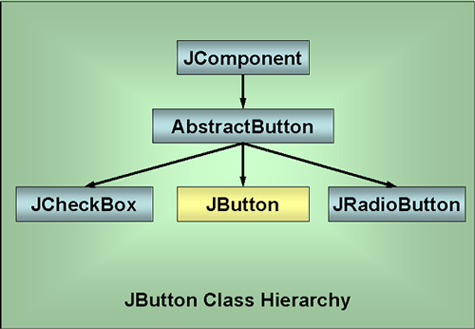
| While there are other
AbstractButtons, the JToggleButton in particular,
this should give you some sense of how different
classes are used to develop other classes.
Think about the properties and methods that are
likeliest to be common to all of these less
abstract buttons. It helps you understand
why the developers of Java wanted one set of
things that they wouldn't have to redevelop for
each implementation or type of button. Much
more about this when we get to classes and objects
in the last five weeks of the semester. Now back to JButton. JButton has four basic constructors that we are likeliest to use.
Some examples follow.
It will almost always be the case that we will need to implement some additional features in order to get our GUIs to recognize user interactions. This will not occur for two more webpages. The next webpage will give an example of an applet and an application that construct a GUI based on these components. It won't have hardly any functionality. The functionality will be added later as we present more classes and methods. |