Improving Web Layout:

Lists and Tables


Some Background. In the ever continuing challenge to create an interesting and energetic web it can often be useful to structure the layout of a page in a variety of ways.  Two of the most frequently used structures relate to listing things and organizing entries in tables.  Lists can be either bulleted or numbered.  You can indent them in a variety of ways to make them more helpful.  Tables can be used in so many different ways it is nearly impossible to characterize them.  We will present examples of a variety of uses in hopes these will stimulate your own use of these structures.


Bulleted Lists. Imagine a situation in your web where you want to list a variety of links that you enjoy most.  You don't want to prioritize them, but you want to organize them in a systematic fashion so that they are made more obvious on the page.  You are likely to use a bulleted list.

It is possible to select different graphics for the bullet either by using a theme or by formatting.  We are just going to create a bulleted list by using the bullet icon on the formatting tool bar.

Well anyway, I assume you get the idea by now.

You can format the bullets by the following steps.

  1. Click on the Format menu

  2. Select the Bullets and Numbering item

  3. Start modifying to your heart's content


Numbered Lists. There are a large variety of situations where it can be important to number the items in a list.  For example, it may be important to communicate some sort of sequence of events or number the items in a list for later reference like we have a few times in this web.  The process is exactly the same as creating bulleted lists so we will not repeat it.  These numberings can also be modified. 


Tables. Tables are ubiquitous in organizing the layout of a web page.  You would be surprised to find out how often they are used coordinate an overall design.   So far in this web I have used several simple tables to present information.  For example, a table was used to organize the syllabus on the course homepage.  I have also used tables to organize the discussion and purpose of particular icons.  

One of my favorite uses of a table to organize a web is used on the pages at the link  ComedyCentral.com.  You can sometimes see the presence of an underlying table to organize the images and text when a page loads.

Tables are developed in FrontPage the same as they are in Microsoft Word.  But their presence can be quite difficult to perceive on some webpages.

One way I like to use a table is to group an image with some relevant discussion.

and I bet you thought you only got the blues when it rains ... not that the rain was actually blue
well this should be a little more exciting ... assuming you are looking for some excitement


You can definitely modify the properties used in a table to do things like right/center/left justify the contents of a cell.  You can also justify the entire table.  You can set the borders to different widths.  You can modify the background just within a table.  All of these things and many more appear in the Table menu.

Inserting and Formatting a Table.  To insert a table you need to

  1. Click on the Table menu
  2. Select the Insert item
  3. Select the table item in the sub-menu that appears

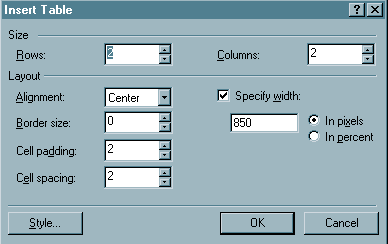
You should see a dialogue window that looks like the following.


You can select
  • the number of rows and columns
  • specify the size of the table
  • its alignment
  • the size of a border if any
  • how tight the entries should fit to the border

along with other features.

After you have inserted a table you can always modify it by using the Table menu and do things like

  • delete and merge cells
  • modify cell properties under the Properties item in the menu
  • modify the table properties under the Properties item in the menu

Make sure to distinguish between whether you are setting properties for selected cells or the entire table.

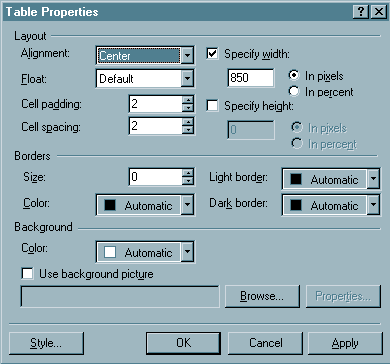
The dialogue for modifying table properties is given next.  You get this dialogue by

  1. Select the Table menu
  2. Click the Properties item
  3. Select Table in the sub-menu that appears

You should see a dialogue like the following.


Here you can adjust the same properties as when created.  You can also modify the background of the table.

You can modify cell properties by following similar steps.

  1. Select the Table menu
  2. Click the Properties item
  3. Select Cell in the sub-menu that appears

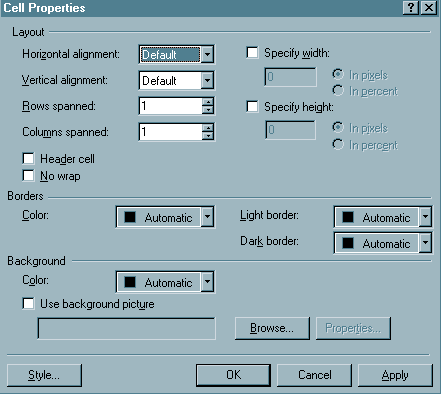
The following dialogue will appear


Notice that you can specify things such as the background for individual cells.