Some Background on UserForms, Controls and Events
|
Introduction. In your first course in VisualBasic you undoubtedly worked with forms, controls and developed event code. Due to this I will present only a brief review with emphasis on features that differ from VisualBasic for databases. In actuality, there are two major places that you can create forms in Excel.
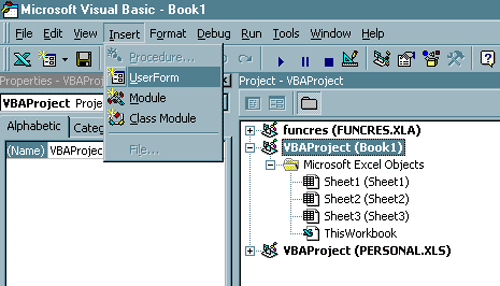
We will focus on developing forms in the VB IDE. We will also make use of controls within a worksheet, but on a much more limited basis. At first it may be a bit confusing to jump between them, but that shouldn't last long. What you want to do now is open a new workbook. Now you want to work through the following steps in order to insert a new UserForm.
|
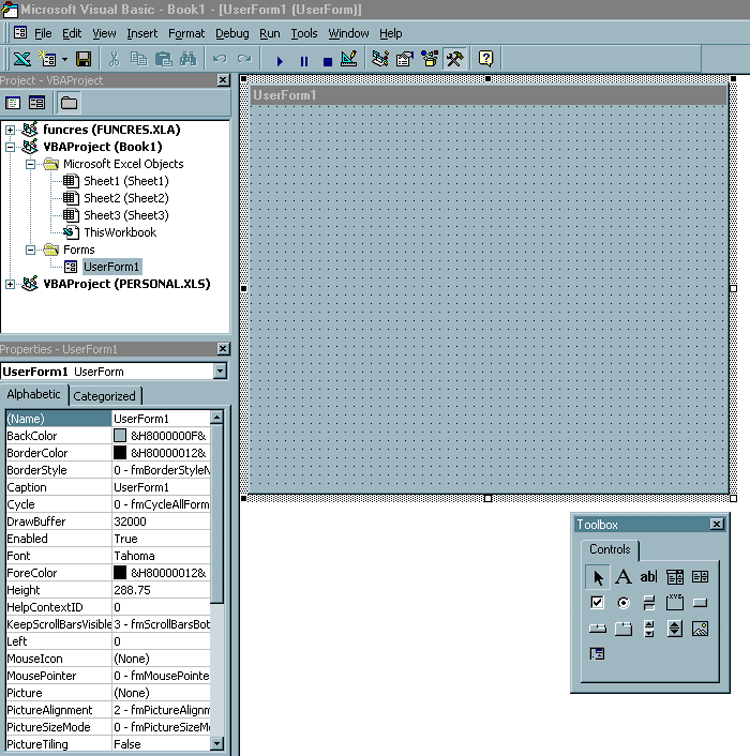
| Now you should get a new UserForm like the following. You should also expand the size of the form slightly. If your Toolbox doesn't appear you need to click on the View menu and Select the Toolbox item. You can position it wherever you want. Notice the following image also contains the Project Explorer and the Properties Window, both of which should be quite familiar. |
| The Toolbox and Controls. Before going any further I want to describe the tools in the toolbox. Most of them should be quite familiar, though the default tools in the Excel VB IDE are somewhat different than in the pure VB IDE. The following table has a discussion of each. You can determine the identity of each tool by hovering your mouse pointer over the icon so that the name of the tool will appear in a little window. Each of these tools is associated with a control. |
| Tool/Control | Description |
| Pointer | Allows you to select objects in the form window |
| Label | Use this to display labels or text in your form |
| TextBox | This allows a user to input text or to have text appear from some other source. |
| ComboBox | This is a drop down box that contains a predetermined set of entries for the user to select from. It usually takes up less space than a ListBox. |
| ListBox | This presents a list of items for the user to select from. |
| CheckBox | This is good for selecting something that is either/or, yes/no. |
| OptionButton | This is useful when the user needs to select from a small number of items. They are almost always used in groups. |
| ToggleButton | This has only two states, either on or off. |
| Frame | This is used to enclose smaller subsets of controls on a form. This can be done aesthetically or to logically group sets of controls. |
| CommandButton | Click on one of these to execute some event code such as open another form, find certain data or whatever. |
| TabStrip | A bit of a pain in the large fleshy part of your body that you often sit on. It is better to use the MultiPage. |
| MultiPage | This allows you to create tabbed dialogues with several pages that are easy to move between. A good example of one of these is for the format cells dialogue in Excel. |
| ScrollBar | Use this to change the controls value. It is different from a SpinButton in that you can drag a button to change values in larger increments. Good for selecting a value that can range over a wide scale of possible values. |
| SpinButton | You can increment or decrement the value in the control with which it is associated. Usually used with a TextBox or Label. |
| Image | Use this to put images into your form either from a file or pasted from the clipboard. |
| RefEdit | Use this to enable a user to select a range in a worksheet. |
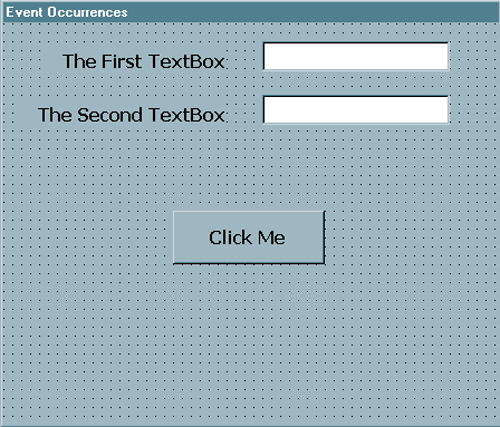
| Putting Some Controls on the Form. It is necessary to have some review of events and developing event code. We will develop a simple form with two labels, two textboxes and one command button. We will then copy event code into several different events associated with these controls. The following table contains the controls you should add to the UserForm and the properties you should change. |
| Control | Property | Value |
| Form | Name | frmEvents |
| Caption | Event Occurrences | |
| Font | Tahoma - 12PT - Bold | |
| Label | Name | lblFirst |
| Caption | The First TextBox | |
| TextAlign | Right | |
| Label | Name | lblSecond |
| Caption | The Second TextBox | |
| TextAlign | Right | |
| TextBox | Name | txtFirst |
| TextBox | Name | txtSecond |
| CommandButton | Name | cmdButton |
| Caption | Click Me |
| You want to put these controls onto the new UserForm so that they look something like the following. |
| Events and Event Code.
In order for a user to interact with a form,
which is the word we will use in place of dialogue and window, the
program needs to monitor when the user does certain things with the
form. There are a large variety of interactions that VisualBasic
watches for, from mouse click to moving into certain areas. These
monitored interactions are called events.
When an event occurs it is possible to have written some VB code so that
other things happen for the user.
If you double click on the cmdButton control you will bring up a code window that looks like the following. |
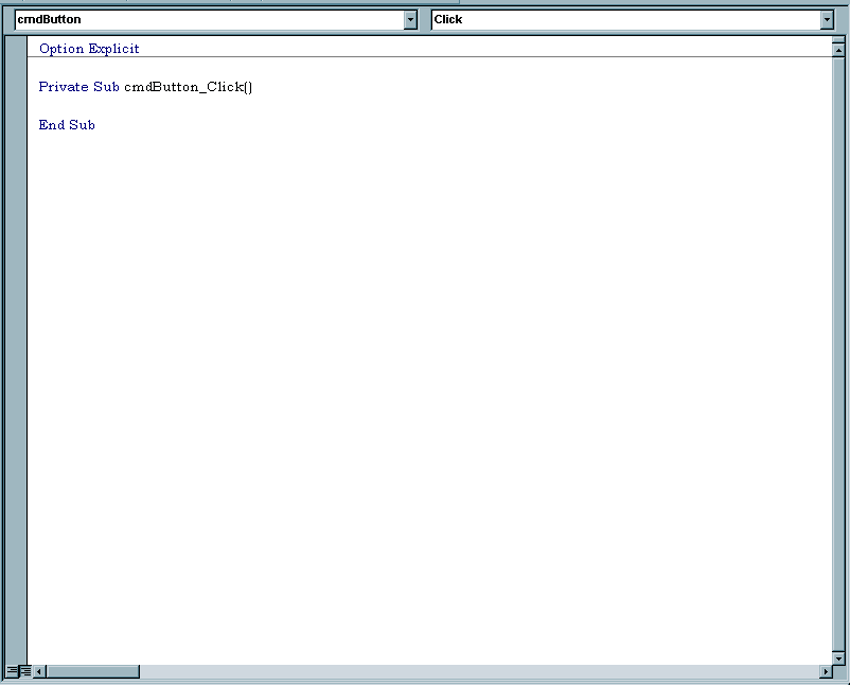
| Notice the Private Sub
cmdButton_Click( ) statement that appears in order for you to
start entering the event code for the click event of the command button.
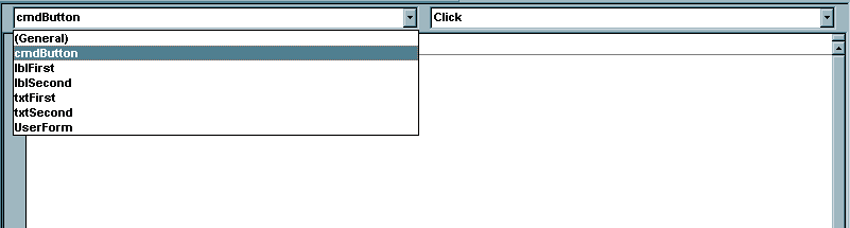
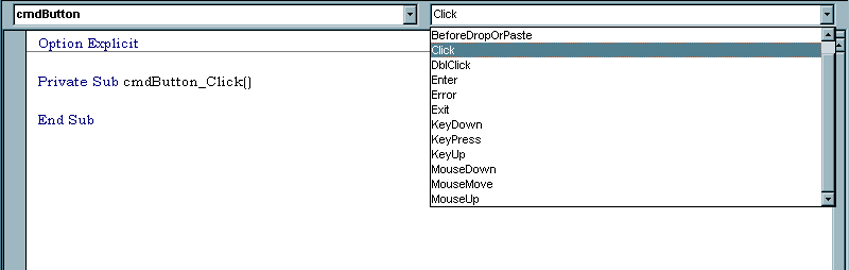
You should notice the combo box on the upper left, called the Controls Combo Box, which lists all of the controls associated with the form. You should also notice the combo box on the upper right, called the Events Combo Box, which contains the events that VisualBasic monitors for each of the controls. In the case of the command button, the Click event is the event that a developer is most likely to use so it is the default when the developer double clicks the command button. Different controls have different default events. For example, the text boxes will default to a Change event. In order to make use of a different event the developer needs to select that event from the event combo box. The following image shows the code window with the control combo box expanded. |
| The next image shows the code window with the event combo box expanded. Notice that both combo boxes can have a scroll bar to allow the developer to scroll through even more controls or events. |
Now you want to copy the following code in for the
cmdButton_Click event.
This will cause the user to get a message box when they click the command button. Now the set of events gets more involved. You should double click on the first text box and copy in the following code.
Now you want to use the event combo box to select the MouseDown event. You should copy the following code into the procedure for this event. Make sure to ignore the words that are wrapped in the procedure declaration. There are a lot of arguments to pass for this event.
Now you want to use the event combo box to select the KeyPress event. You should copy the following code into the procedure for this event.
We could certainly put in messages for when other events occur, but this should give you the picture. One thing you might remember from the pure VB IDE is that there were many more events that could occur in the event combo box. Finally you want to enter similar code for each of these same events for the second text box. For the Change event.
For the MouseDown event in the second textbox.
And finally for the KeyPress event for the second textbox.
Now you can execute the program by using the Run menu or the Run icon on the toolbar. This should convey to you a sense of the sequence of events and some of the potential for using event code. Executing the Event Code. VisualBasic in Excel is slightly different than the stand-alone VisualBasic. In order to implement the code you may want some sort of executable code to be invoked from the spreadsheet. When working in Excel it will be very important to distinguish whether the control is on a spreadsheet or on a UserForm. Up to now we have worked purely with UserForms. now we want to put a command button onto Sheet1 in order to execute the code associated with frmEvents that we have just developed. You need to work through the following steps.
This code goes with the spreadsheet rather than with the form. We will emphasize these sorts of little distinctions all semester.
Hopefully you now have a better sense of event sequences and event monitoring. We will be doing these sorts of things for the rest of the semester, though in more useful ways. |