
Creating and Customizing ToolBars
| Introduction.
When creating forms or enhancements for use in spreadsheets it is often
the case that you would like to modify or create toolbars
or menus. In general, toolbars
are considered a bit nicer since they only require one mouse move and
click to actuate the command. Thus they are usually reserved for
very frequently used commands since they occupy more prominent positions
on a user interface. Menus require a minimum of two mouse moves
and clicks since you must at least select a menu and then an item in the
menu if not another submenu. But either way they can improve
accessibility to newly developed or pre-existing features. In this webpage we will focus on toolbars. In general, Microsoft has created a class of objects called the CommandBar object. Within this class of objects there are three major types of command bars described in the following table. |
| Type | Description |
| Toolbar | This bar can either float or be docked. It contains one or more command buttons, click to execute controls. These buttons are usually square with some representative icon. |
| Menu bar | These are built in and almost always appear near the top towards the left of a form or window. For example, in Excel there is a Worksheet Menu Bar that appears by default in all spreadsheets. |
| Shortcut/Popup Menu | When you right click an object this is the object dependent menu that pops up. |
There are a variety of ways that a developer can modify
toolbars in Excel.
You can perform customizations either through VBA code or use the exiting menu options of click on the View menu » select the Toolbars item » then select the Customize item in the popup submenu that appears. Developing a Macro Toolbar. We have developed a few macros in class and in homework. It could definitely be nice to have these on a toolbar instead of having to remember the shortcut key or go through the menus and select the macro. In this webpage we will just go through developing a custom toolbar and adding a button with an image for the Income Statement macro we developed earlier in the semester. It is likely you can't even remember what the shortcut key was even though I tried to make it at least somewhat mnemonic. You want to work through the following steps.
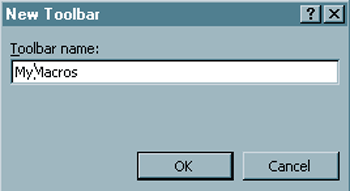
Now you should see a dialogue form like the following. |
|
|
![]()
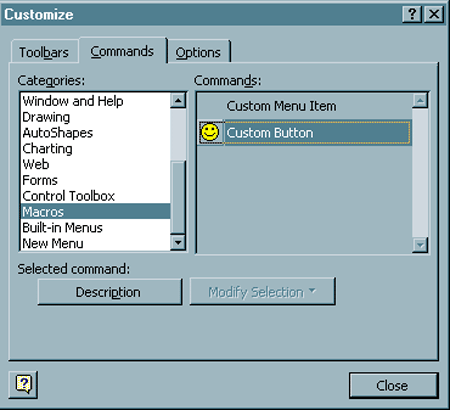
The dialogue should look like the following. |
|

If you find these happy faces as obnoxious as I do you
will be more than ready to get rid of this. Don't worry, it can
happen none too quickly as far as I'm concerned.
|
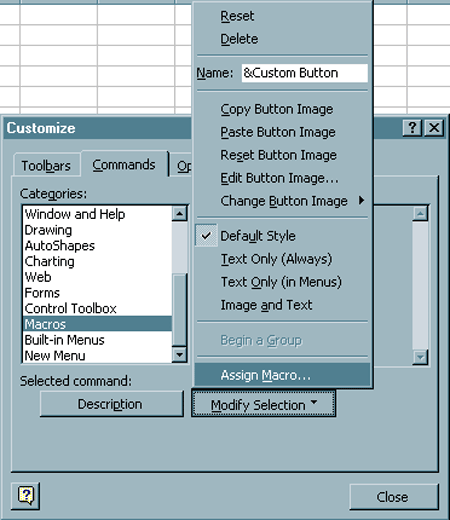
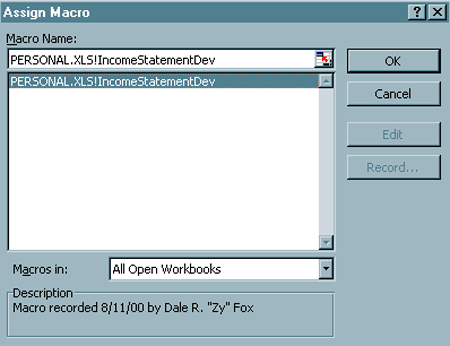
Now you should get the following dialogue.
|
Now we want to change the icon to something more palatable.
|
![]()
You can use this to select an icon. If you don't
want to use one of these icons or if you want to modify one of them
You should get the following icon editor. I have already made the modifications that I wanted by putting a block I and S on top of the image. Each of the little boxes corresponds to a bit in the image that will appear on the screen. |
![]()
| While hardly a very interesting improvement it gives
you some sense of how to modify an existing image.
Remember, to make sure a particular toolbar appears or doesn't appear in a workbook you may have to go through the View » Toolbars sequence in the menus. While there are many other things you can do with toolbars, this should more than suffice for most situations. Now we will move on to customization of menus in the next webpage. |