Cell and Range References and Names
|
Relative and Absolute Addressing. After having made use of relative and absolute addressing I want to present a little summary. Cell references occur in four different ways.
It is hopefully obvious by now that you use different approaches to addressing depending on how you want cell references in a formula to change when the formula is copied. |
Referencing Other Sheets or Workbooks. It is also possible to access information from other sheets within your current workbook, or even from other workbooks. This is done with the ! operator. Let's say you need the Total Sales figure from another sheet in your workbook. The name of the sheet is Sheet3 since you haven't yet bothered to rename it. The information is in cell C13 in that sheet. To access that information you would use the name
This can also be used to access this information from a completely different workbook. Assume the Total Sales figure is in a workbook called Budget.xls. Then to access this information in another workbook you would use the reference
Much of this referencing is made easier at the time of use by locating the cell in the desired open workbook and spreadsheet by pointing and clicking on the cell. At this point the reference address will be automatically filled in. If the name includes spaces in it you need to enclose the reference in single quotation marks. Assume the workbook is named Budget & Sales.xls. Then the reference would be
Finally, if the workbook is closed then you need to include a complete path such as
|
| Naming Cells and Ranges.
It is often worthwhile to make the extra effort to give a cell or a
range of cells a name. This allows the developer to use the name
in place of typing a cell address or range. This can have many
advantages, particularly when someone else is looking at your
spreadsheet or you come back to it after not having used it for a while.
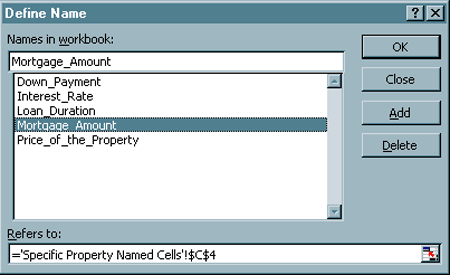
For example, in the MortgageBasics.xls workbook
Now it will be possible to use these names in the cell formulas. It would be just as easy to name a range of cells after selecting them. The following image shows the Define dialog window after all five of these names have been defined. |
| If we had defined these named cells earlier we could
have used them directly when we created the cell formulas. But, in
this instance we already created the cell formulas and now want to
modify them to make use of these names. We will carry this out for
only one of the formulas on this spreadsheet. From this example it
should be clear how this can be repeated to modify other cell formulas
as desired.
Originally, the cell formula for the payment amount in cell C5 on the Specific Property sheet was =PMT($B5/12,12*$B$23,C$4) Now you should select the cell C5 on the Specific Property Named Cells spreadsheet and perform the following steps.
|

=PMT($B5/12,12*Loan_Duration,Mortgage_Amount) This has significantly more meaning to an outside viewer and it will also help you remember all of the meanings of the formulas when you refer back to the sheet in the future. |
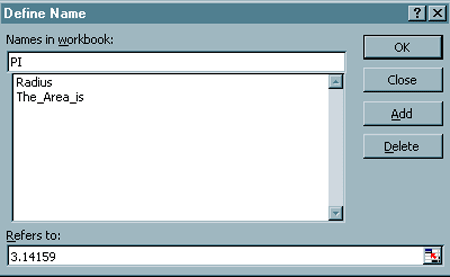
Naming Constants.
It is also possible to use this naming process to define
constants. I will work a very simple example finding the area of a
circle.
The dialog window should look like the following. |
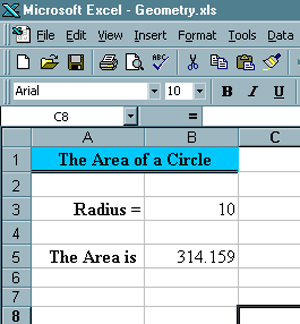
=PI*Radius^2 Now the spreadsheet should contain cells like the following when you put a number in for the Radius in cell B3. |
| Some Other Issues. You can apply names to entire columns and rows. You can also name formulas and any other objects in a workbook. Probably the most important remaining issue associated with naming has to do with the scope of a name. The scope of the name refers to how long or in what locations it remains unique. The default scope for any name is the workbook. By default you can only use each name once within a workbook. You can then use it again in another workbook, which can be very important. But in order to limit the scope of a name further you need to follow special steps. |