Developing a UserForm that Accesses Data in a Spreadsheet
Some Background. In the last webpage we developed a userform and event code so that a user could enter data on the form and write it to a spreadsheet. This is a fairly common application and we developed it in the context of a referee recording his refereeing jobs. But we want to be able to do more than just write to the spreadsheet, we also want to be able to look at past entries and possibly delete them. To do this we want to add two command buttons though it would certainly be reasonable to add others
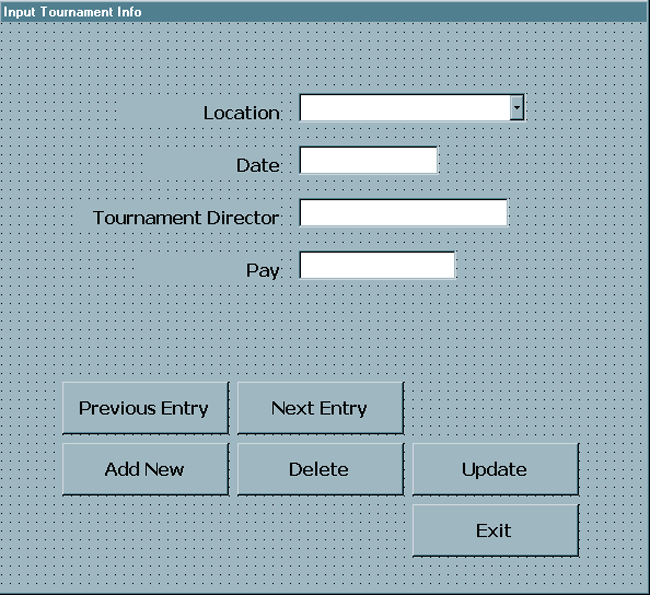
While there are plenty of other things you are likely to want, or related things you might have on a different spreadsheet within the same workbook, we will start with these. Working these examples should provide you with some more useful working prototypical controls. Developing the UserForm. You are going to modify the frmTournament we were using in the last webpage to look like the following. |

| The following table lists the controls and the properties that we have added or modified. You want to put the cboLocation in place of the txtLocation. |
| Control | Property | Value |
| ComboBox | Name | cboLocation |
| RowSource | Sheet3!A1:A7 | |
| CommandButton | Name | cmdPrevious |
| Caption | Previous Entry | |
| CommandButton | Name | cmdNext |
| Caption | Next Entry |
You should type the following
entries into the Sheet3.
You need to enter the RowSource property so that you can get the entries in the combobox from elsewhere in the workbook. Obviously it would be possible to create a form to help you with this. Remember, if you add more tournament locations to the list in Sheet3, you must modify the RowSource property on the combobox control accordingly. |
|
The Event Code for the
Upgraded Form. The first thing you need to do is make
sure that you are starting out with Sheet2 as the active
worksheet. You also want to make sure you are starting out in cell
A1 when you initiate the form so that the Previous Entry and Next Entry
command buttons will work.
You have already done the work necessary to get the cboLocation combobox to work. All that is left is the code for the Next Entry and Previous Entry command buttons. We will start with the cmdPrevious_Click( ) event code.
This code gives a message when you can't move earlier in the data source. If you aren't trying to move to entries that don't exist it selects the cell that is one above the current cell and makes it the active cell. Then it fills in the controls on the form using the offset property relative to this cell. The code for the cmdNext_Click( ) event is very similar and follows.
This code first ensures that you are not trying to move beyond the contents of the data source. Then it uses a similar approach to the last routine by moving the active cell down one row. After this active cell has changed it fills in the form controls using the offset property. Redesigning the Delete Command Button. Now we want to go one step further and allow the user to actually delete past entries. The delete operation itself is quite simple, adjusting the active cell and what appears on the form is a bit more complicated. You can fill in the form with the current entries unless you delete the last entry in the data source. Since we are using a move the cells up operation after the delete, if you delete the last row you need to move up a row before you fill in the form and accept your active cell. The code follows and will be discussed in more detail in class.
You should feel free to assume that there are many other upgrades we could implement for this form, but hopefully this gives you a realistic sense of some things that can and should be done in such a situation. |