Creating and Customizing Menus
| Introduction.
When creating forms or templates it is usually worthwhile to
adjust or create menus in addition to toolbars. Customizing menus
in Excel can be done through the customization dialogues similar to what
was done with the toolbars. This customization process is significantly different from how
menus are developed in the pure VisualBasic IDE. Personally, I
prefer the approach of the stand alone VB IDE, but this is a course in
advanced Excel and VisualBasic so I adapt as best I can. You can also write VisualBasic code
to implement menus. Writing VB code to
implement a custom menu will be considered to be beyond the scope of
this course.
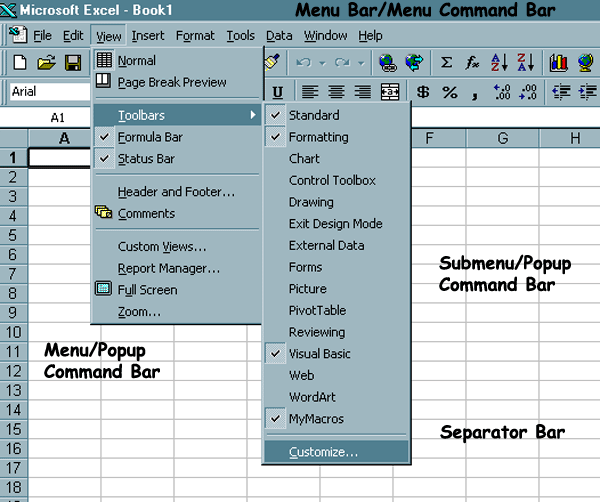
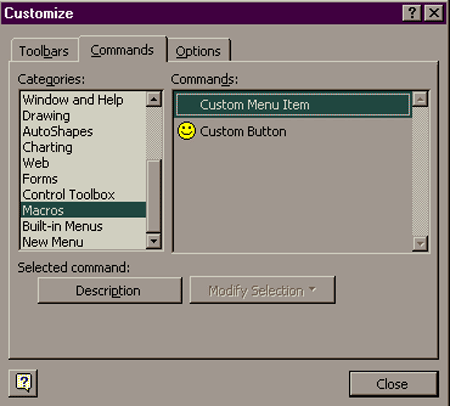
The following image and table should elucidate much of the jargon associated with menus. |
| Jargon |
Description |
| Menu Bar | The row of words that appears directly below the application title bar. |
| Menu | The column of items that appears like a drop down list when you click on an item in the menu bar. |
| Menu Item | A single row in the menu. |
| Separator Bar | Horizontal bar on a menu that helps organize a larger menu into relevant groupings. |
| Submenu | Menu items that have a rightward pointing triangle have a submenu that appears next to them when selected. |
| Popup menu | What appears when you right click an object |
| Enabled | If a menu item is available under certain conditions. |
| Image | The icon that sometimes appears to the left of a menu item. |
| Shortcut key | A keystroke combination that allows the user to circumvent going through the menu selection. Usually appear to the right of the menu item. |
| It is possible to
create a new CommandBar to contain
the menus or you can use an existing one. We just put in a new
toolbar/CommandBar called MyMacros in our last webpage and it would
require the same
process to do a new menubar/CommandBar. Remember they are
essentially the same object. What we will do in this
webpage is add a menu or two to the new toolbar to show you that you can
mix tool buttons and menus on the same bar.
There are any number of situations where you might prefer to use a menu over a toolbar or vice-a-versa. Remember a toolbar executes some command with a mouse move and a single click, and a menu will require at least two mouse moves and two clicks. The menu can require even more if there are submenus. But it still can be advantageous to use menus in different situations. We describe a couple such scenarios in the following paragraphs. Consider a situation where you are working for a firm such as Azulike and you want to create a variety of different macros that will create the desired template for a number of different types of spreadsheets. For example you may want to have a macro to create a template for a cash budget, computing financial ratios, forecasting, or capital budgeting. If you tried to use shortcut keys to execute all of these you are likely to forget the key combinations. It is almost certain that anyone else trying to use the shortcut keys would struggle to discover what they were and remember them. In such a situation you are likely to have a menu for Azulike with menu items that represent each of these templates. Each item in the menu would execute a macro to develop the template. Another scenario is quite similar. Maybe you do work for a number of different companies and you want to have a menu and templates for each type of spreadsheet. For example a menu for Income Statements, Ratios Forecasting or Capital Budgeting. Then within each menu you could list the company so that the templates would have formatting appropriate to each company. In both these examples menus have advantages over other representations, they help you circumvent the need to remember shortcut keys, they have words written out to help you identify the functions, the macros/functions are grouped systematically to improve ease of use among others. We already know how to add a command bar, which can be used as a menu bar or tool bar, from the last webpage. What we will do in the next section is consider a situation like the second scenario where you are an external accountant or financial analyst. We will use the MyMacros toolbar created in the last webpage and add a menu for Income Statements to it. Then within this menu we will create items for each company. From this you will be able to see how to customize your menus further if you desire. |
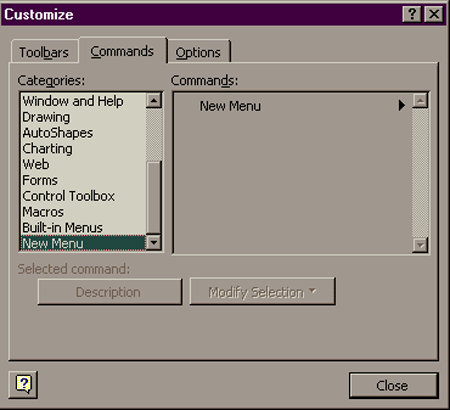
Adding a Custom Menu to a
CommandBar. Now you will be led through the steps associated
with adding a new menu to an existing command bar.
The dialogue form should look like the following. |
The image should now look like the following. |
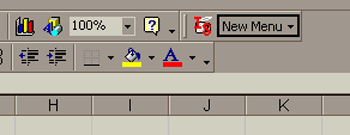
|
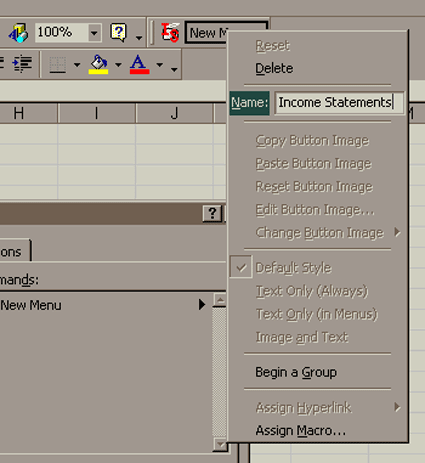
| This will change the menu name accordingly. Now
we want to add a command to the menu.
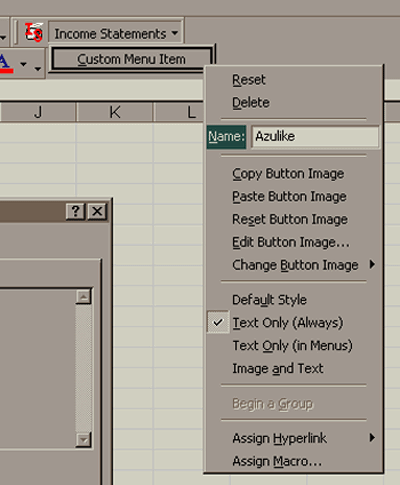
Adding Commands to a Menu. We have just created our new menu on our toolbar and now we want to add a menu item. This can also be done to any other existing menu.
The dialogue should look like the following. |
The new menu will look like the following. |

The popup menu and changes should look like the following. |
|
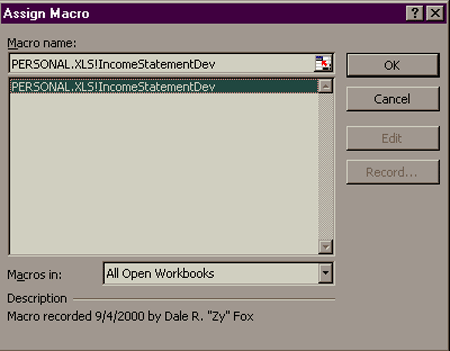
As you can see it would be easy to create other macros that should be included on this menu. You no longer have to worry about remembering shortcut keys. You can also create other menus. |