Managing Shipping


Introduction.  Now we need to create an interface to display and modify shipping rates.  We need both a form for display and modification, ManageShipping.asp.  The processing scripts for adding, deleting and updating will be in the next page.  The ManageShipping.asp has a stored procedure to retrieve the current shipping information from the Shipping table for display in the form.

The following table gives the ASP and stored procedure we will develop in this page.


Stored Procedure ASP Container
sp_GetShippingRate ManageShipping.asp


The Stored Procedure.  First we present the stored procedure.  Remember, you do not need to implement the stored procedures, this is to illustrate what you would need to do if you had the correct permissions in your database.  

The first stored procedure uses a  SELECT command in SQL to obtain all of the information from the Shipping table.  The stored procedure sp_GetShippingRate was previously developed when we computed the shipping and tax during the checkout process in the store.

The ManageShipping.asp.  This is essentially a form page to display and allow modification of shipping rates.  There are links to processing scripts that allow the addition of rates, updating rates and their deletion.  You need to save this file and upload it to your StoreManager subdirectory.

  1. It uses the validatecheck.asp include to make sure the user didn't try to circumvent the security.  
  2. It then uses the navinclude.asp to create the common navigation at the top of each page in the store manager.
  3. Connect to the database and execute the sp_GetShippingRate stored procedure to return all of the shipping rates.
  4. Develops the page to display the information and accept modifications.
    1. The first part of the page is a form that allows updating and deleting of existing cut-offs and rates.  This form posts to UpdateShipping.asp.  The Delete links connect to the DeleteShipping.asp.
    2. The second part of the page is a form that allows for adding entirely new volume cutoffs and rates.  This form posts to the AddShipping.asp.

Call the file ManageShipping.asp.

<%@ Language=VBScript %>
<!-- #Include file="include/validatecheck.asp" -->
<HTML>
<!-- ManageShipping.asp - Handles the listing of the 
shipping rates. And, it provides functions for
deleting shipping rates and adding new ones. -->


<HEAD>
<META NAME="GENERATOR" Content="Microsoft Visual Studio 6.0">
</HEAD>
<BODY>
<!-- #include file="include/navinclude.asp" -->

<%

' Create an ADO database connection
set dbShipping = server.createobject("adodb.connection")

' Create the record set
set rsShipping = server.CreateObject("adodb.recordset")

' Open the connection using our SQL Server DSN-less connection
dbShipping.ConnectionString="Driver={SQL Server}; Server=cisdev.quinnipiac.edu;" & _
"Database=WildWillies;UID=cis; PWD=csatqu"

dbShipping.Open

' Setup the Retrieve Shipping Rates stored 
' procedure to retrieve all of the current
' shipping rates.

sql = "execute sp_GetShippingRate"

' Execute the statement
set rsShipping = dbShipping.Execute(sql)

%>

<!-- Start the form for updating the shipping -->
<form method="post" action="UpdateShipping.asp">

<!-- Start the table to display the shipping rates. -->
<table border="1" cellpadding="3" cellspacing="3">
<tr>
<th>ID</th>
<th>Low<BR>Quantity</th>
<th>High<BR>Quantity</th>
<th>Fee</th>
<th>Delete</th>
</tr>

<%

' Loop through the shipping rates.
do until rsShipping.EOF

%>

<!-- Loop through the shipping rate ranges -->
<tr>
<!-- Show the quantity range id -->
<td><%=rsShipping("idQuantityRange")%></td>
<td>
<!-- Built input for the low quantity. Note that
the field name is built to include the id 
of the quantity range. -->

<input type="text" name="intLow<%=rsShipping("idQuantityRange")%>" 
value="<%=rsShipping("intLowQuantity")%>" size="6">
</td>
<td>
<!-- Built input for the high quantity. Note that
the field name is built to include the id 
of the quantity range. -->

<input type="text" name="intHigh<%=rsShipping("idQuantityRange")%>" 
value="<%=rsShipping("intHighQuantity")%>" size="6">
</td>
<td>
<!-- Built input for the fee. Note that the field 
name is built to include the id of the quantity 
range. --> 

<input type="text" name="intFee<%=rsShipping("idQuantityRange")%>" 
value="<%=rsShipping("intFee")%>" size="6">
</td>
<td>
<!-- Build a delete link with the id of the quantity range. -->
<a href="deleteshipping.asp?idQuantityRange=
<%=rsShipping("idQuantityRange")%>">Delete</a>
</td>
</tr>

<%

' Move to the next row.
rsShipping.MoveNext

' Loop back
Loop

%>

<!-- Build the submit button -->
<tr>
<td colspan="5" align="center">
<input type="submit" value="Submit" name="Submit">
</td>
</tr>

</table>
</form>

<BR><hr><BR>

<!-- Start the form for adding new quantity ranges -->
<form method="post" action="AddShipping.asp">

<!-- Start the table -->
<table border="1" cellpadding="3" cellspacing="3">

<!-- Build the header -->
<tr>
<th>Low<BR>Quantity</th>
<th>High<BR>Quantity</th>
<th>Fee</th>
</tr>
<!-- Build the first new quantity option -->
<tr>
<td>
<input type="text" name="intLow1" value="" size="6">
</td>
<td>
<input type="text" name="intHigh1" value="" size="6">
</td>
<td>
<input type="text" name="intFee1" value="" size="6">
</td>
</tr>
<!-- Build the second new quantity option -->
<tr>
<td>
<input type="text" name="intLow2" value="" size="6">
</td>
<td>
<input type="text" name="intHigh2" value="" size="6">
</td>
<td>
<input type="text" name="intFee2" value="" size="6">
</td>
</tr>
<!-- Build the third new quantity option -->
<tr>
<td>
<input type="text" name="intLow3" value="" size="6">
</td>
<td>
<input type="text" name="intHigh3" value="" size="6">
</td>
<td>
<input type="text" name="intFee3" value="" size="6">
</td>
</tr>

<!-- Build the submit button -->
<tr>
<td colspan="3" align="center"><input type="submit" value="Submit" name="Submit"></td>
</tr>
</table>
</form>

</BODY>
</HTML>


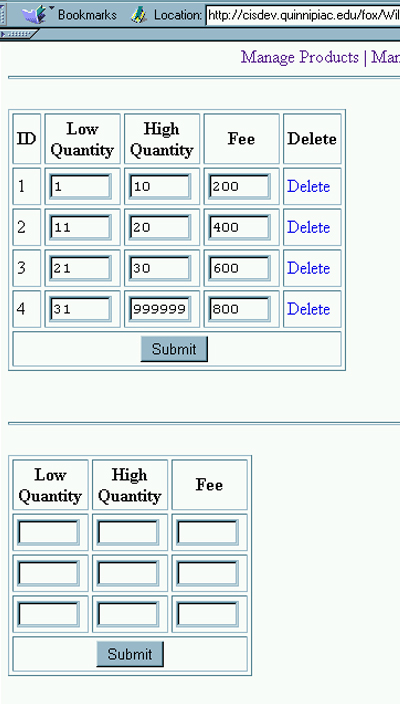
The form page should look like the following.  Notice the two main forms, one for updating and deleting, the other for adding.