Managing Each Department in the Store Manager
| Introduction. Now
we really on managing each department.
This interface is more sophisticated because of the variety of things
you need to be able to do with each department. Remember, with the
ListDepts.asp we were setting up options for "grosser"
operations on departments, adding products, listing them
out. Even when we wanted to add a product we needed to create a
more specialized interface in NewDeptt.asp. Now we will focus on
what needs to be done to manage each department that might be selected by
the user.
The following table gives the ASP and single stored procedure we will develop in this page. |
| Stored Procedure | ASP Container |
sp_RetrieveDept |
ManageDept.asp |
| The Stored Procedures.
First we present the stored procedure. Remember, you do not need
to implement the stored procedures, this is to illustrate what you would
need to do if you had the correct permissions in your database.
The sp_RetrieveDept uses a SELECT command to retrieve all of the information about a specific department in the Department table. This was developed when we developed the Products.asp for the store. The ManageDept.asp. This is essentially a form page to allow you to interact with other processing scripts to perform the modifications. You need to save this file and upload it to your StoreManager subdirectory. This ASP will do the following.
Call the file ManageDept.asp. |
| <%@ Language=VBScript %> <!-- #Include file="include/validatecheck.asp" --> <HTML> <!-- ManageDept.asp - Handles the management of the the department and allows the shopper to update the data. --> <HEAD> <META NAME="GENERATOR" Content="Microsoft Visual Studio 6.0"> </HEAD> <BODY> <!-- #Include file="include/navinclude.asp" --> <% ' Create an ADO database connection set dbDept = server.createobject("adodb.connection") ' Create the record set set rsDept = server.CreateObject("adodb.recordset") ' Open the connection using our SQL Server DSN-less connection dbDept.ConnectionString="Driver={SQL Server}; Server=cisdev.quinnipiac.edu;" & _ "Database=WildWillies;UID=cis; PWD=csatqu" dbDept.Open ' The retrieve sp_RetrieveDept stored procedure to ' retrieve the data on the specified departments. sql = "execute sp_RetrieveDept " & request("idDepartment") ' Execute the statement set rsDept = dbDept.Execute(sql) %> <!-- The form is created to post the changes --> <form method="post" action="UpdateDept.asp"> <!-- Start the table to display the product data --> <table cellpadding="3" cellspacing="3"> <tr> <td>Preview Department:</td> <td> <!-- Build a link to the products.asp page in the live store. The id of the department is passed into the page. This will provide a quick preview of the department. --> <a href="../products.asp?idDept=<%=request("idDepartment")%>">Preview</a> </td> </tr> <tr> <td>Delete Department:</td> <!-- A link is built to the DeleteDept.asp page. The id of the department is sent into the page. --> <td><a href="DeleteDept.asp?idDepartment=<%=request("idDepartment")%>"> Delete</a></td> </tr> <!-- Build a buffer between this section and the next --> <tr> <td colspan="2"><hr></td> </tr> <tr> <td>Department ID</td> <!-- The ID of the department is displayed. It is not allowed to be edited since it is set. --> <td><%=rsDept("idDepartment")%> <input type="hidden" value="<%=rsDept("idDepartment")%>" name="idDepartment"> </td> </tr> <!-- Edit department name. --> <tr> <td>Department Name</td> <td><input type="text" value="<%=rsDept("chrDeptName")%>" name="chrDeptName"</td> </tr> <!-- Edit department description in a text box. --> <tr> <td>Department Description</td> <td><textarea name="txtDeptDesc" cols="40" rows="5"><%=rsDept("txtDeptDesc")%></textarea></td> </tr> <!-- Edit department image. Note the image is displayed next to the image file name. --> <tr> <td>Department Image</td> <td><input type="text" value="<%=rsDept("chrDeptImage")%>" name="chrDeptImage"> <img src="../images/<%=rsDept("chrDeptImage")%>" align="center"></td> </tr> <!-- Submit button for the form. --> <tr> <td colspan="2"><input type="Submit" value="Update Department" name="Submit"></td> </tr> </table> </form> </BODY> </HTML> |
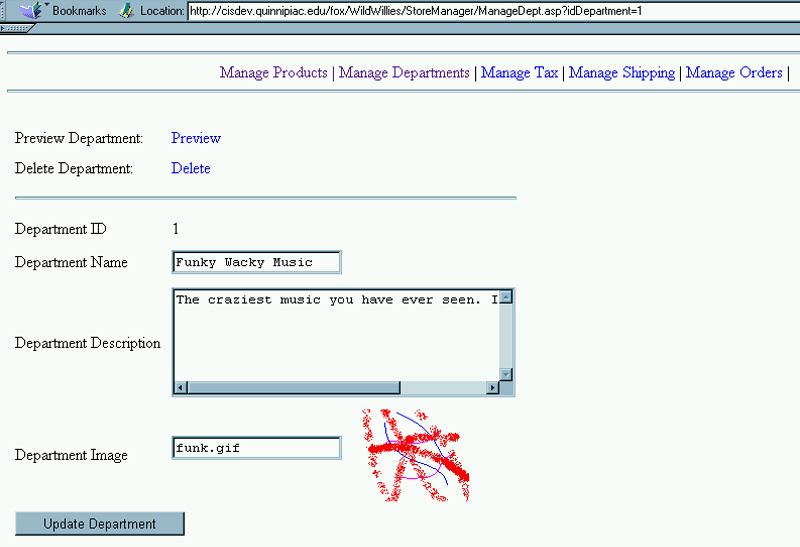
| After you upload this ASP and access it in your web, probably by clicking on the Joe Bob's Thimble Sounds link you should see something like the following. Notice you need to scroll in order to get access all parts of this form. |
Notice the extra options available on
this page.
|